This series of articles in our blog is motivated by the amount of news circulating with headlines like “Android malware steals your bank details”, “Malware that won’t uninstall from your Android”, “Malware that reinstalls without you noticing”…. The question is, how does it work at the system level, how do they get out of the sandbox that is generated when the App is installed, do they only use social engineering or are there more interesting technical aspects? For this reason, we decided to set up a laboratory to analyze in detail the techniques used by these pieces of malware.
We use an infrastructure similar to the one that will be described in our laboratory accredited to perform Security Evaluations of IT products and in our Red Team activities.
1.Virtual machine installation in VirtualBox
As we are going to execute malicious code it will be important to be able to return the system to a pre-infection state at any time. Although this can be done with physical devices, it is much more convenient to do it with virtual machines, because at any time we can take a snapshot of the system, and at any time we can return the system to the state of any of the snapshots almost immediately.
As a virtualization platform we will use Virtualbox and for android emulation on Virtualbox we will use the Open Source project Android_x86 which is actively maintained and updated. There are alternatives, for example Genymotion which has better performance but we lose control because these Genymotion machines raise a Host-Only interface on your host, which is a risk we prefer to avoid. There is also CuckooDroid which is a sandbox for Android malware analysis that we may try in the future.
We will install a machine through which all network requests made by Android will pass, and where we will install all the necessary software for the analysis. We will use a Debian based system. The scheme to follow will be as follows:
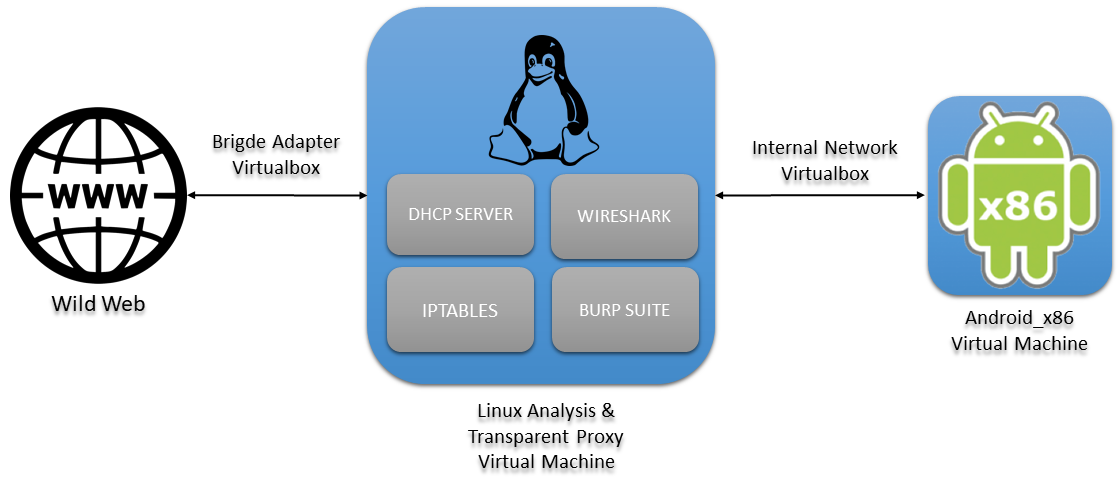
1.1. Linux Analysis & Transparent Proxy Virtual Machine
1.1.1. Machine specifications
In the center of the previous scheme we will have the analysis machine that through a network interface, in bridge mode, will be connected to the internet (eth0) and through the other interface (eth1) will be connected to the internal network of Virtualbox. Since we are going to run a lot of software at the same time on the analysis machine, we have to dedicate more than 2GB of RAM, in our case 4GB. We also have to add one more interface (eth1) where the DHCP server will be configured and where the Android machine will be connected.
1.1.2. Tools
There are hundreds of tools for both dynamic and static analysis of Android applications. Here is the installation of the tools that we have found most relevant.
sudo apt install adb docker docker.io docker-compose android-sdk openjdk-8-jre wireshark -y
- Static Analysis:
wget https://github.com/skylot/jadx/releases/download/v1.2.0/jadx-1.2.0.zip
sudo mv jadx-1.2.0.zip /usr/local/bin/jadx-1.2.0.zip
sudo unzip /usr/local/bin/jadx-1.2.0.zip -d /usr/local/bin/jadx-1.2.0
sudo rm /usr/local/bin/jadx-1.2.0.zip
sudo ln -s /usr/local/bin/jadx-1.2.0/bin/jadx /usr/local/bin/jadx
sudo ln -s /usr/local/bin/jadx-1.2.0/bin/jadx-gui /usr/local/bin/jadx-gui
wget https://raw.githubusercontent.com/iBotPeaches/Apktool/master/scripts/linux/apktool
wget https://bitbucket.org/iBotPeaches/apktool/downloads/apktool_2.5.0.jar
mv apktool_2.5.0.jar apktool.jar
sudo mv apktool.jar /usr/local/bin
sudo mv apktool /usr/local/bin
sudo chmod +x /usr/local/bin/apktool.jar
sudo chmod +x /usr/local/bin/apktool
- Dynamic Analysis:
sudo apt install python3-pip
pip3 install frida-tools
wget https://raw.githubusercontent.com/JakeWharton/pidcat/master/pidcat.py
chmod +x pidcat
mv pidcat /bin/
-
- Burp: download from official site.
chmod +x burpsuite_community_linux_v2020_12_1.sh
./burpsuite_community_linux_v2020_12_1.sh
- Hybrid
sudo docker pull opensecurity/mobile-security-framework-mobsf
echo “alias mobsf=’sudo docker run -it -p 8000:8000 opensecurity/mobile-security-framework-mobsf:latest'” >> ~/.bashrc
1.1.3. DHCP server installation and configuration
To install:
sudo apt install isc-dhcp-server
Add the interface, in the file /etc/default/isc-dhcp-server, where you want to let the dhcp running. Modify the line INTERFACESv4="" to INTERFACESv4="eth1"
Then in the file /etc/dhcp/dhcpd.conf it must be modified as follows:
option domain-name-servers 8.8.8.8, 8.8.4.4;
default-lease-time 600;
max-lease-time 7200;
ddns-update-style none;
authoritative;
subnet 10.0.0.0 netmask 255.255.255.0 {
range 10.0.0.10 10.0.0.20;
option domain-name-servers 8.8.8.8;
option subnet-mask 255.255.255.0;
option routers 10.0.0.1;
option broadcast-address 10.0.0.255;
default-lease-time 600;
max-lease-time 7200;
}
It is highly recommended to disable network-manager: service network-manager stop. Also install net-tools and ifupdown for the configuration of the network interfaces, which sometimes does not come with some distros.
For our eth1 interface to work, it must have an IP. We set it in /etc/network/interfaces as follows:
auto eth0
iface eth0 inet dhcp
auto eth1 iface eth1
inet static address 10.0.0.1
netmask 255.255.255.0
And now restart the service: service isc-server-dhcp restart
1.1.4. Transparent Proxy with iptables
First we clean up the rules, to make sure we start from zero:
iptables -F
iptables -X
iptables -Z
iptables -t nat -F
We set the default policy:
iptables -P INPUT ACCEPT
iptables -P OUTPUT ACCEPT
iptables -P FORWARD ACCEPT
iptables -t nat -P PREROUTING ACCEPT
iptables -t nat -P POSTROUTING ACCEPT
First we have to enable traffic forwarding through the machine with:
echo 1 > /proc/sys/net/ipv4/ip_forward
We will post the other rules later:
## FORWARD CHAIN
iptables -A FORWARD -i eth0 -o eth1 -m state –state ESTABLISHED,RELATED -j ACCEPT
iptables -A FORWARD -i eth1 -o eth0 -m state –state NEW -j ACCEPT
## NAT
iptables -t nat -A POSTROUTING -o eth0 -j MASQUERADE
## HTTP and HTTPS for Burpsuite
iptables -t nat -A PREROUTING -p tcp –dport 80 -j REDIRECT –to-port 8082
iptables -t nat -A PREROUTING -p tcp –dport 443 -j REDIRECT –to-port 8082
We will configure Burp later to finish configuring the proxy, but now let’s go to the Android machine.
1.2. Android_x86 Virtual Machine
Download the Android-x86 version from the official site. A 64-bit version is strongly recommended. The steps to install these systems in Virtualbox are described in the following link.
To make a quick summary of what is indicated in the link:
- Create a virtual machine of Linux type and Linux version 2.6/3.x/4.x (64bits).
- Dedicate more than one processor to the machine.
- Important step: It is mandatory to configure VBoxVGA instead of VBSVGA in the Display options dialog box.
Then some options that we added for the lab:
- Also add as much video memory as possible (128MB).
- In the network interfaces, leave only one, in internal_network mode with the same name as the proxy’s internal_network (they will be on the same network).
Boot the machine with the downloaded .iso disk. The operating system installation wizard will start. From here you have to follow the next steps:
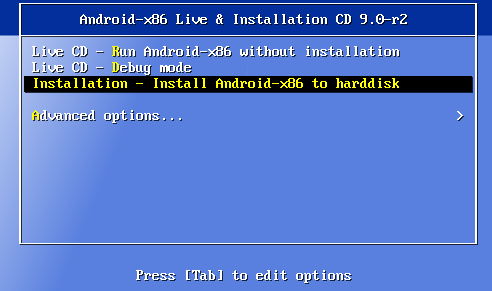
- Choose the option “Installation – Install Android-x86 to harddisk”.
- On the question of the use of GPT choose no
- Now you have to create a partition. Press New>Primary>Select the whole disk>Bootable>Write>Confirm and wait, then Quit
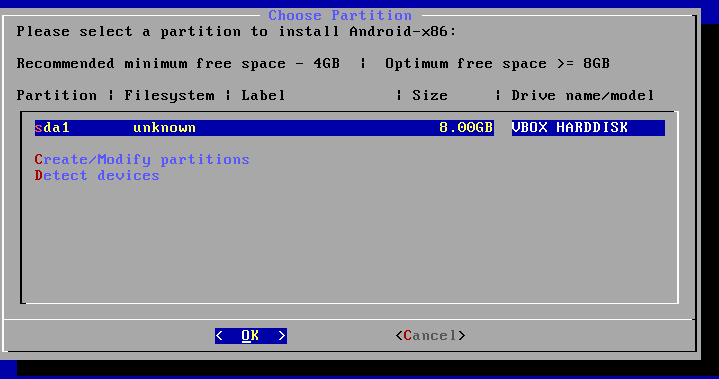
- Select the new partition we have just created, choose the “ext4” format, then confirm.
- To the GRUB installation question choose yes.
- Important step: When asked whether to install the /system directory as read-write choose yes.
And Android will then be finally installed in a Virtualbox virtual machine.
2. Burp Suite and CA install
We are going to use the Burp Suite Community version as a web proxy for viewing HTTP/S calls. In order to work with Burp Suite as a transparent proxy on Android you have to install the Burp certificate as a Root CA. To do this you need to follow the steps below:
- Open Burp
- Import the certificate in .cer format from Burp. Proxy>Options>Import/export CA certificate> Select the option “Certificate in DER format”> Save in the desired location.
- Execute in bash to install the certificate (replace with the variables between <>):
openssl x509 -inform DER -in <CERTIFICATE_BURP> -out cacert.pem
hash=`openssl x509 -inform PEM -subject_hash_old -in cacert.pem | head -1`
cert_hash=$hash.0
mv cacert.pem $cert_hash
adb connect <IP_ANDROID_MACHINE>
adb root
adb connect <IP_ANDROID_MACHINE>
adb remount
adb push $cert_hash /sdcard/
adb shell “mv /sdcard/$cert_hash /system/etc/security/cacerts/”
adb shell “chmod 644 /system/etc/security/cacerts/$cert_hash”
adb shell “reboot”
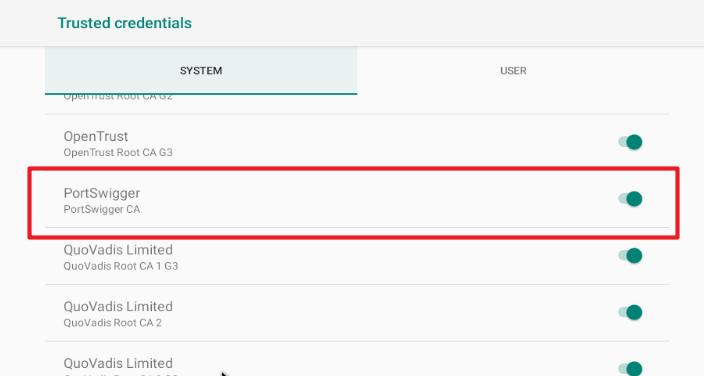
If we go to Settings on the Android machine and look for the “Trusted credentials” section we can see how our certificate has been installed as the system CA:
The proxy also has to be configured in Burp.
- In the Proxy>Intercerpt tab, turn off intercerpt for now.
- Then in Proxy>Options>Proxy Listeners>Add
- In Bind to port: 8082
- In Bind to address: All interfaces
- In the “Request handling” tab of the same window enable the option “Support invisible proxying (enable only if needed)”.

Burp would already be listening on port 8082 for all HTTP/S requests that it will receive thanks to the Iptables rules that we have configured previously:
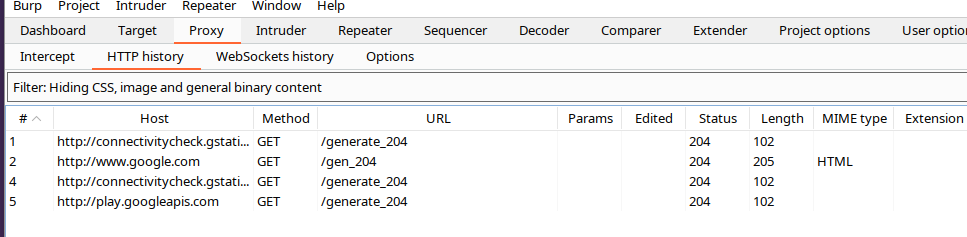
NOTE: It is possible that HTTP/S requests are made through ports that are not the common ones and in our case we have only added to Iptables the requests that have port 80/443 as destination. In this case, it would be necessary to look at the Wireshark frames and detect which ports are used and then add a rule to Iptables with this port.
In coming articles of this series we will be looking at examples of malware that use specific techniques, theory or tools that we find interesting.
SOURCES:
Internal Networking – Virtualbox [Malware Lab]
Configuring Burp Suite With Android Nougat
Using Burp’s Invisible Proxy Settings to Test a Non-Proxy-Aware Thick Client Application
Iptables incluyendo para proxy transparente
Proxying Android app traffic – Common issues / Checklist